How to Extend Sitefinity’s Form Control to Autofill Data in Marketo
July 15, 2014 / by Chris Aybar

A Step-by-Step Guide to Modifying the Sitefinity Forms Control to Autofill Data in Marketo
Admit it.
You hate filling out web forms. They’re so annoying.
As digital marketers we should actually be empathetic, or at least tolerant of these pesky lead capture mechanisms – but we aren’t.
We hate them all the same - and you can bet that our audience members loathe them even more.
But what can we do? Forms are necessary for any digital marketing strategy. We can’t get rid of them.
So instead, we make them easier for visitors to complete by reducing the number of fields, improving the user interface, writing more succinct copy, and using ingenious features, like autofill.
What is Autofill and How is it Used with Lead Capture Forms?
Autofill occurs when data is collected and aggregated in a browser cookie, and later used to automatically complete a form field.
For example, let’s imagine that John Smith is a frequent visitor to your website. The following sequence of images illustrate how autofill can be used to augment the user experience on various lead capture forms throughout your website.
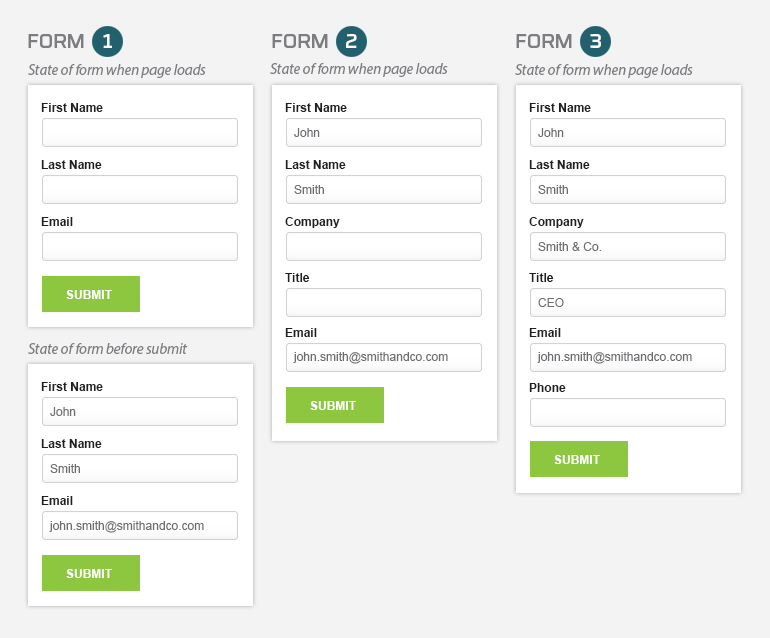
Form #1
The first time John lands on a lead capture form on your website, all fields are blank. John will complete the form and when it is submitted, the lead capture data will be persisted in a browser cookie.
Form #2
When John returns to your website and lands on another lead capture form, the form fields will be automatically filled with the data collected during the first form submission. Thus, only requiring John to complete the new fields.
Form #3
Finally, as John encounters new lead capture forms on your website, the autofill feature will continue to complete form fields with the lead capture data collected in prior visits.
What are the Benefits of Using AutoFill in Lead Capture Forms
This ability to pre-populate lead capture form fields is one of the best things that has ever happened to conversion marketing.
- It makes completing forms on your website easier for users.
- It reminds leads that they’ve engaged with your website in the past, and reinforces your brand.
- It gives you the opportunity to progressively collect more information about each user as engagements increase, without making your brand seem like a data-hungry monkey.
And as you collect more and more information about each lead, you can get even more and more targeted through lead scoring, lead qualification and segmentation.
And it is through these sophisticated targeting strategies that you can send more relevant marketing communications, which ultimately leads to more conversions and more sales.
It’s every marketer’s dream!
So, you can imagine how devastated we were to find out that integrating Progress Sitefinity CMS with Marketo marketing automation tool breaks the autofill feature.
We just couldn’t live with that disappointment. So, we set out to solve the problem.

Setting Up Our Test
Integrate Sitefinity CMS with Marketo Marketing Automation Tool
Just recently, we were engaged to design and develop a streamlined process for capturing leads in Sitefinity CMS and saving them into the client’s marketing automation tool, Marketo.
So this seemed like the perfect opportunity to solve the autofill problem, once and for all.
As a Progress Sitefinity partner and certified developer, we have been asked to customize this easy-to-use .NET content management system many times before. Often times, that means we must create a new Sitefinity module or widget (commonly referred to as user controls) in order to enhance the client’s marketing efforts.
But in this case, Sitefinity has done a lot of the hard work already. The system has a built-in Sitefinity Forms Module, and a very convenient Sitefinity Marketo Connector that allows for easy integration between the two systems.
Therefore, we created our first proof of concept by setting up the Sitefinity Marketo Connector, and then creating a simple test form with Sitefinity fields mapped to known Marketo fields.
Then after completing a few test submissions, it was clear that the form Autofill was not working.
Solving the Problem
Extend Sitefinity Form Control to Automatically Fill Forms in Marketo
To solve this problem, we asked ourselves some very basic questions about the feasibility of implementing this seemingly rudimentary, but desirable feature:
- Is it possible to save the lead capture data when a form is submitted?
- Is it possible to restore pertinent lead capture data on a completely different form when it’s loaded?
- And, could this be accomplished by simply extending the Sitefinity Forms Control?
Since we believed these answers to be yes, we started off by proving that submitted form field data could easily be stored and retrieved via an HTTPCookie. Indeed, we found all the necessary underpinnings to make this a reality.
Sitefinity modules raise events that can be subscribed to via the Sitefinity EventHub; the particular event we were interested in being IFormEntryCreatedEvent.
Second, we believed that instead of building a brand new form control, it would be much easier to extend the existing Sitefinity Forms Control class by simply overriding the necessary methods to allow the form to pre‐populate fields before page rendering was complete.
So, by extending the existing Sitefinity Forms Control [widget] class we were able to replace the existing toolbox widget with a “Smarter” version that automatically pre‐populates all lead capture forms.
And voila…the autofill feature started working like a charm.

Implementing the Solution
Step-by-Step Directions on How to Extend Sitefinity Form Control to Autofill Forms in Marketo
Implementing our solution to extend Sitefinity Forms Control to autofill forms in Marketo is easy. It amounts to four quick steps:
- Create a static class to save lead capture data into a browser cookie when forms are submitted.
- Create a static class to load all previously saved lead capture data from the browser cookie.
- Extend the Sitefinity Forms Control class to override necessary methods and add new pre‐population methods.
- Update Sitefinity page toolbox to replace the existing Sitefinity Forms Control widget, or add a reference to the newly created “Smart” Forms Control widget.
If you would like to implement this solution yourself, you can download the custom code here.
Let us know how it turns out for you!
[Note: Sitefinity has come out with a number of new updates since we posted this blog post, so if you have any issues implementing the custom code, or need any help with Sitefinity or Marketo, we're here for you. Let's Talk.]

Chris Aybar
Chief Technology Officer
In addition to serving as Roger West’s CTO, Chris is the agency’s secret weapon when it comes to implementing custom-coded solutions, open-source content management systems, or any other technical challenge our clients face. He loves using technology to help people and finding ways to make the seemingly impossible happen.